Transcribing Bangla Youtube Video With Gemini
An end to end guide to transcribe bangla youtube video using gemini flash 2

Let’s build a Bangla Youtube Transcriber using Google’s new Gemini Flash 2.
Why Build This?
I’m working as a professional AI engineer in a startup company. Where We’re building customer support system using Gen AI technologies. We’re facing problem to find out good Bangla open source LLM. I wouldn’t bored you with all the details why I’m doing this but it comes down to mainly one thing, which is contributing to open source Bangla AI community. I want to create a domino effect or inspire other so that other can use this project or some thing else to contribute to Bangla AI community and eventually we start to have or atleast have some decent resources and datasets for Bangla LLM.
And, I do think this project is cool or interesting to me. So, yeah this is another reason
What We’re Building & What to Expect?
I think you can already guessed from the name of it, we’re building Bangla Youtube Transcriber. It’ll basically create a dataset containing the transcribed text from the YouTube audio. Well, I’ll be honest I can’t transcribe whole Bangla videos that are present in YouTube. For this project I’ve chosen Rakibul Hasan’s Youtube channel. I’ve transcribed approximately 60% of his entire youtube channel. “Why 60%?” you may ask. Well the thing is that YouTube is stubborn and it was blocking my automation script that’s why I couldn’t able to download all the audios. After getting the audios we use Gemini Flash 2.0 to trancribe each of the audio into text.
In this blog I’ll show you my thought process and how I’ve build this. But this is not going to be line by line code explanation. I’ll show the overall concept and details so that you can reproduce or build something similar to this. But for the entire code you can check out the github repo
How to get Gemini API Key?
Since, we’re going to use Gemini Flash 2.0 we need to have Google API key. Don’t worry google is generous. They are giving 1,500 API request per day for free without any credit card. All you need to have is google account. Everyone have google account (If you don’t then please for the love of god stop living under a rock).
Step 1. Go to Google AI Studio and login if you’ve not done it already.
Step 2.
Click on the Get Api Key button just shown below.
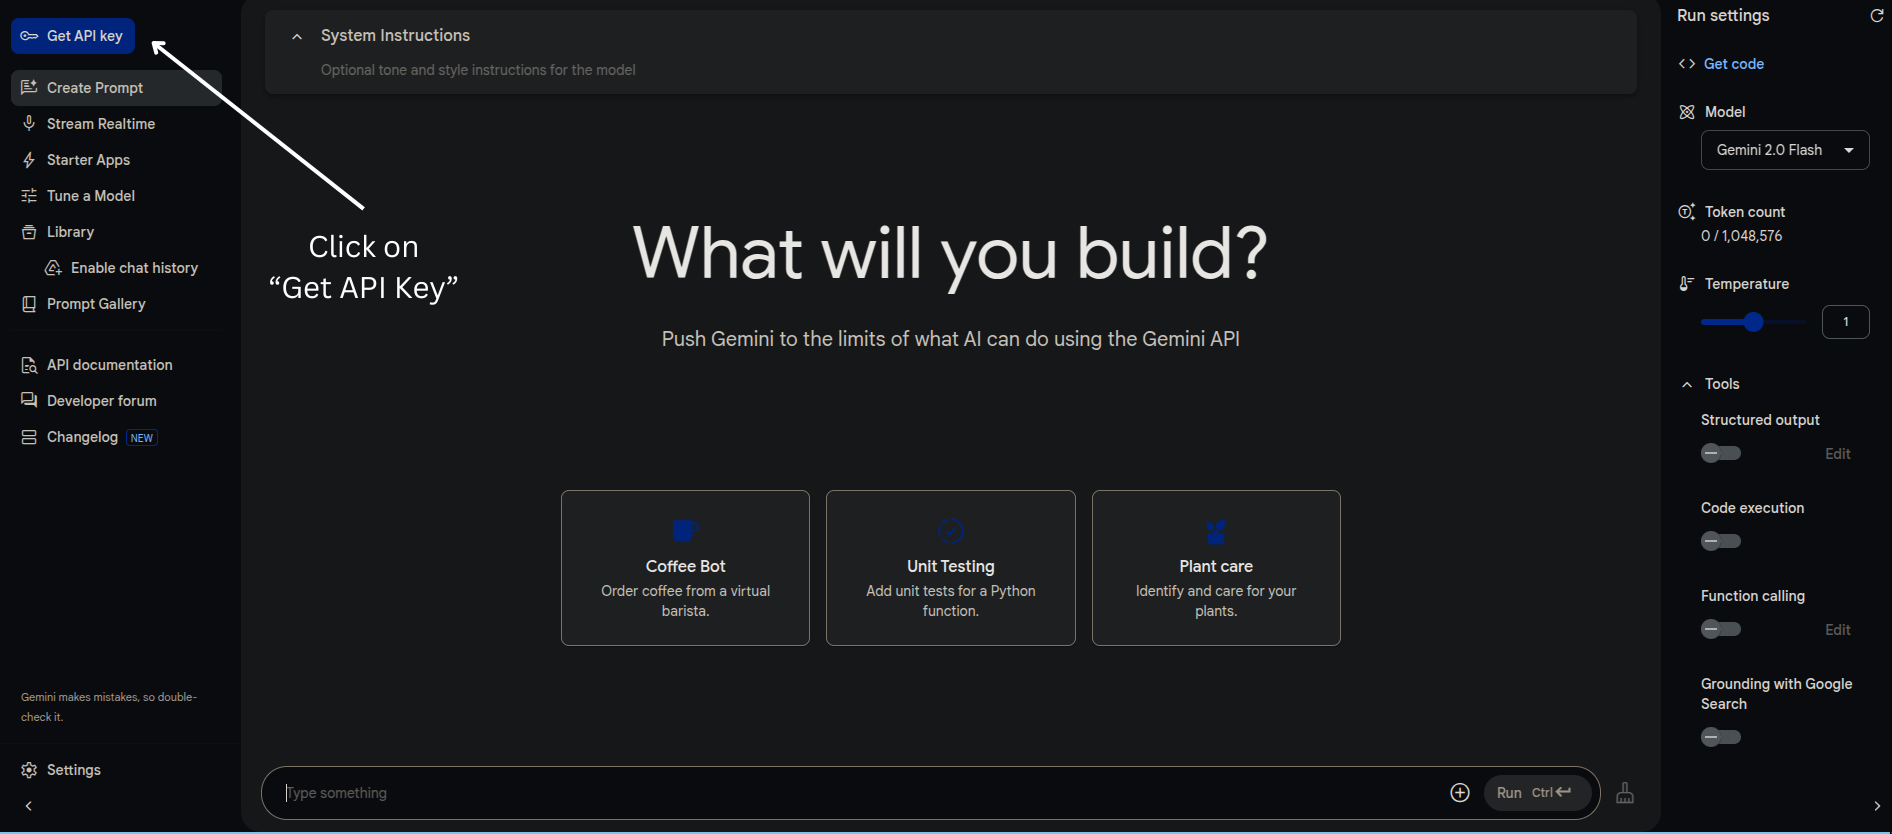
Get Api KeyStep 3.
After that click on the Create Api key button.
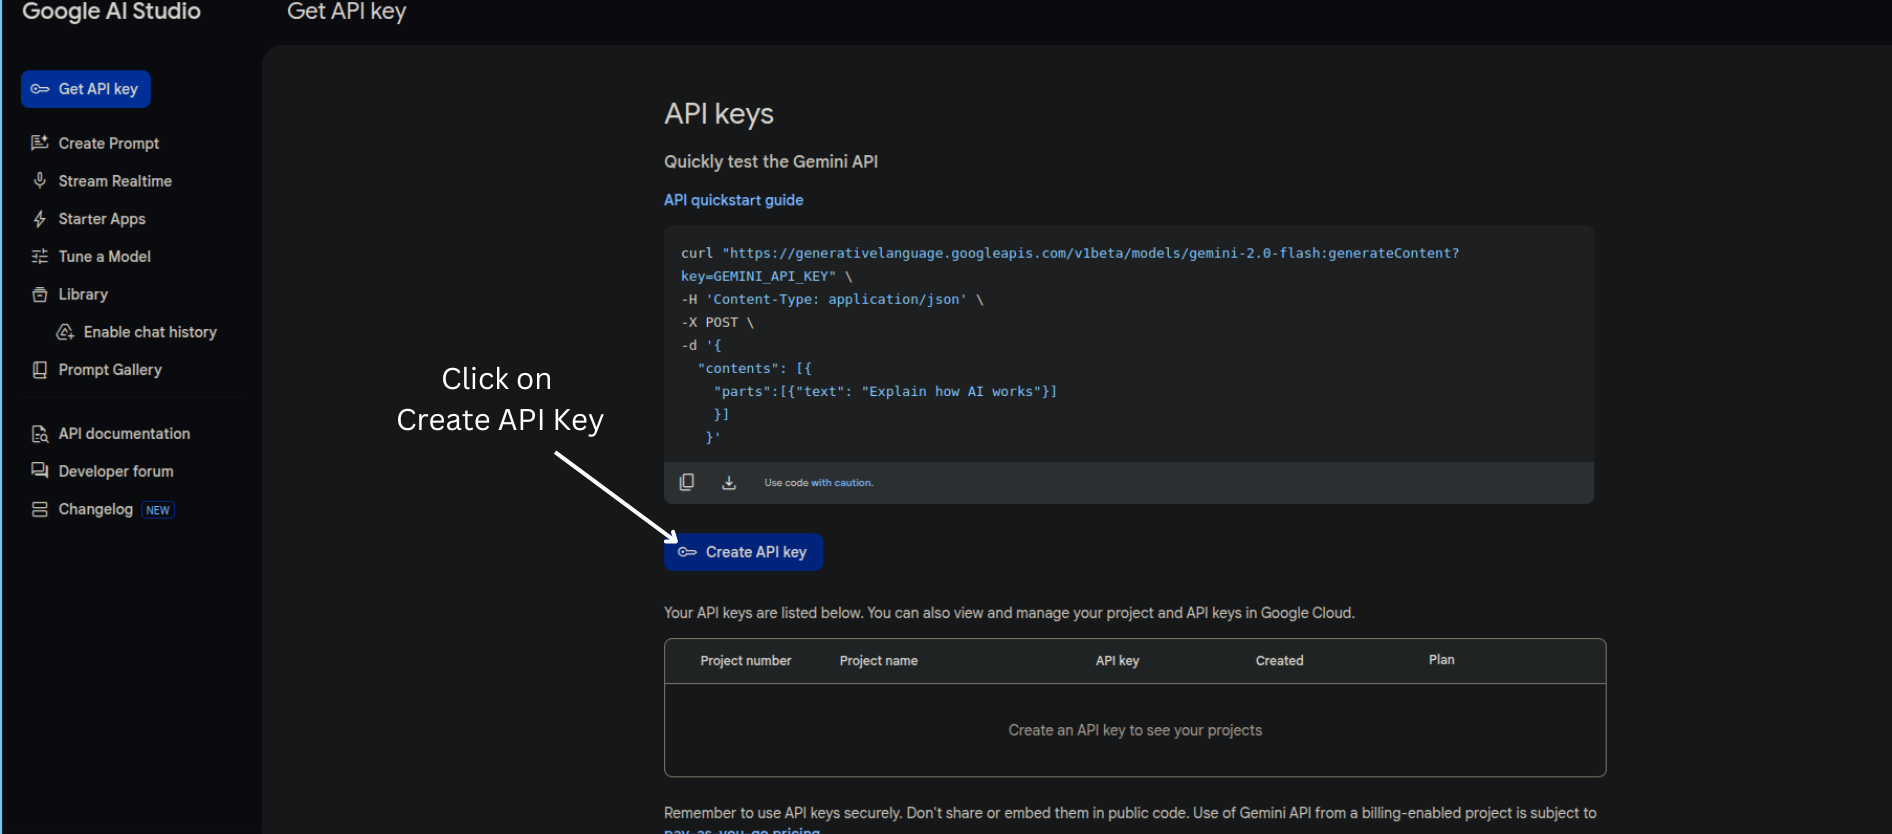
Create Api keyStep 4. Finally, copy the API key and save it somewhere else we’ll be using it later.

That’s it! We’re all set to begin our journey.
Illustration of The Complete Workflow
Here, I’ll be showing you the abstract level illustration of the complete workflow. Which will give you a better picture how this project is going to be.
First I’ve divided this entire task into 2 diffrent phases.
- Phase 1: Downloading the youtube audios
- Phase 2: Generating the transcription
Let’s start with Phase 1.
Youtube Audio Download (Phase 1)
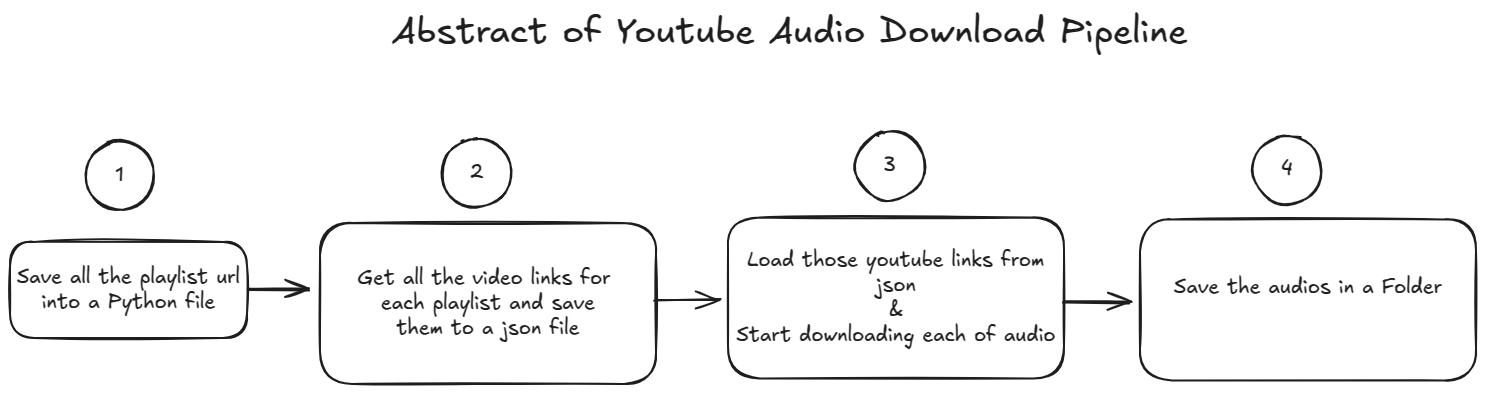
Step 1. Save all the playlist urls in a python file as list
In this step, I’ve gone through all the playlists from Rakibl Hasan’s youtube channel and gathered all the playlist url links and manually save them in a python file as list. “Why did I do this manually?” you may ask. Well, the thing is there weren’t lots of playlist in his channel. So doing it manually didn’t take too much time.
Step 2. Get all video links & save them into a json file
Since I’ve already gathered all the playlists url then the next step is to iterate over all the playlists and get all the video links from each playlist. To do this I’ve used pytube a python library which helps to automate many things related to youtube. After getting all the video urls then I’ve saved them into a json file where the key is the playlist name and the value is the list of video urls.
Step 3. Download all the audios
Now we’ve not only all the playlist url but also all the video urls. “But, Shoaib WHY DID YOU GATHER ALL OF THESE URLS?”. Okay okay don’t start screaming at me I’m telling you. All of this urls are necessary to download the audios from the Youtube video. Remember pytube? This library can directly download audio from any youtube video directly. All we need to do is give that particular youtube video url.
We’ve gathered all the video urls. Now all we need to do is create a python automation script which will download all the audios from the youtube video. This is exactly what I’ve done in this step. I’ll be going to explain the automation script part in the coding section.
Step 4. Save all the audios in a folder
After downloading all the audios I need to save them in a strcture folder structure so that I can access them later. See the below folder structure
└── Audio/
    ├── Playlist_name1/
    │   ├── video_name1.mp3
    │   └── video_name2.mp3
    └── Playlist2/
        ├── video_name1.mp3
        └── video_name2.mp3
In the above you can see all the audio had been saved to Audio folder. Now inside that audio folder it contains all the playlist folders. Each playlist folder is named after the Youtube playlist name. Inside each playlist folder we have audio files and each of the audio files is named after the Youtube video name.
And that’s it. That was the end of the Phase 1. Now you can take a 5 min break my soldier. Only 5 min, do not make it a 50 min fb scrolling session.
Okay, break time is over now start the Phase 2.
Transcription (Phase 2)
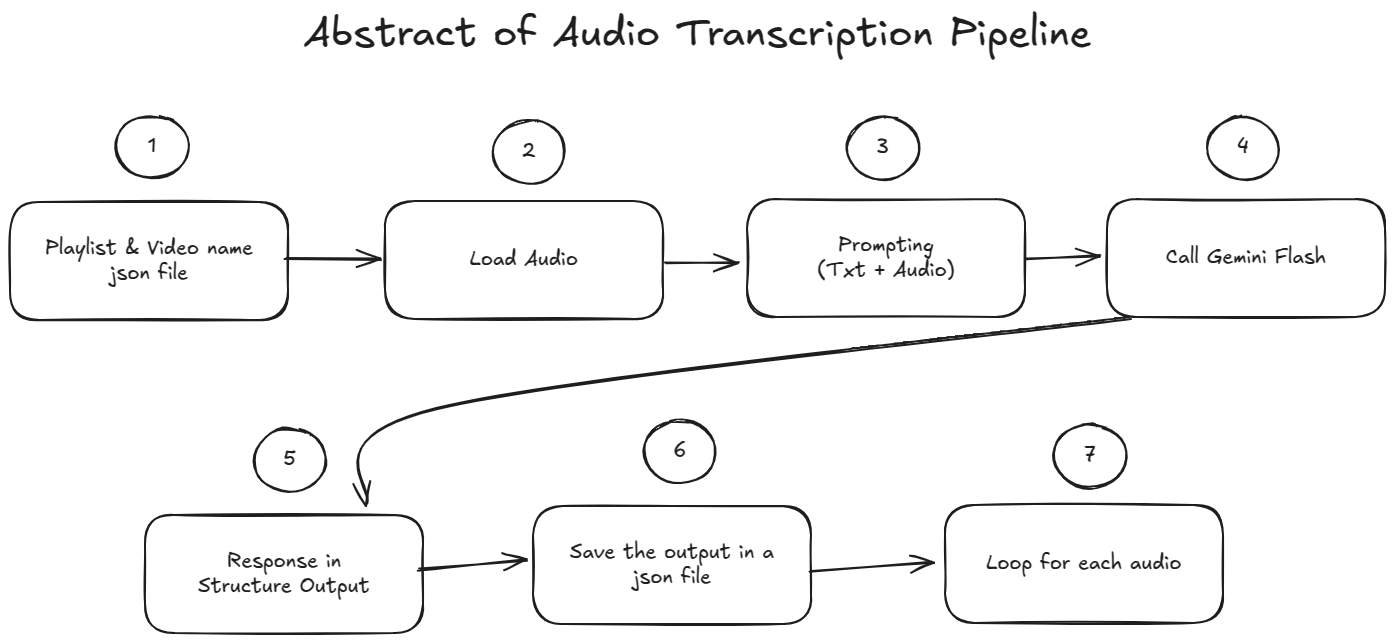
Step 1. Playlist & Video Name Json File
This step proved that I’m stupid. Cause this should’ve been done in the previous phase while automating the url links. You see after I completed the previous phase then I realized that I didn’t track which video belongs to which playlist. I’ve Youtube url of each video. But don’t have the name. That’s why in this step I’ve created another json file containing the playlist name as key and all the video names in a list as value. Luckily I had saved all the audio in tree like strucutre in the previous step therefore all I had to do is go through the Audio folder and save the playlist name and video name in the json file.
The main purpose of creating this json file is that it’ll be used to load the audio (I know there is a better way of doing this, stop judging me, I’ve already told you I’m stupid).
Step 2. Load Audio
In this step I load the json file which was created in the above step. Then I loop over all the playlist and video names and load the audio file. But one thing to note here is that it is an iterative process. Means I’m not loading all the audio files at once. Loading them all at once will cause memory issues. So, I’ve loaded the audio file one by one and then do the below steps and after saving trnascription I’ll repeat the same process for the next audio file.
Step 3. Prompting
This is where I do the prompting. Since Gemini Flash 2.0 is a multimodal model. It can take text as well as audio as input. I’m passing the audio file along side some instructions in the prompt so that it can generate the transcription. I’ll show the detail prompt in the coding section. Beside prompting, there was another configuration that I’ve done. I’m using Structure Output from the model. Means the output return by the model will be in a json format.
Step 4. Calling Gemini Flash 2.0
After prompting we use our api key to call Gemini Flash 2.0 and generate the transcription.
Step 5. Structure Output Response
After calling the api we get the Structure json response. Now the question is why use structure output? This can be answered from many different prespective. But, for our usecase suppose when we prompt the model to generate the transcription and it returns the response but also add additional text such as “I’ll start transcribing the audio now” or “I’ll start processing the audio now”. Now this is a pain in the ___ (fill in the blank). We need only the transcription text anything else is going to mess up the transcription process. Yes, in theory we can prompt the model to return only the transcription text. But, there is still high possibility that the model will return some additional text. So, to avoid this we use structure output. This ensures that the model will return only the transcription text. And also it becomes easier to handle the response.
Step 6. Save The Transcription
Now that I’ve got the transcription from the above step. All I did is save the transcription along with the audio file name and playlist name in a json file.
Step 7. Repeat The Process Untill End
From Step 2 to Step 6 I’ve repeated the process untill I’ve got the transcription for all the audio files.
Automating Youtube Audio Download
Now that we’ve a complete overall understanding of the workflow, it’s time to get our hands dirty with actual coding and how everything works under the hood. Though one think you need to have in mind that I’m not going to explain line by line (comeon you’ve Gemini, ChatGPT. Give them the codebase and tell them to explain line by line). So let’s start!
Manually Copying All Playlist Urls
If you remember that in Phase 1 - Step 1 I’ve gone through each of the playlist and copy pasted them. Again, I know it’s stupid to do that. It’s not automation. But I did it. So, if you’re going to work on
this project then my advice is to automate this step. After manually copying each playlist I’ve put them in PlayListUrl.py. Next part was getting each video links from each of the playlist.
Getting All Video Urls
Code for this step can be found in VideoLinks.py. Instead of going each line let me share the main gist.
First, I’ve imported playLists from PlayListUrl which contain all the playlist urls.
Then I had used pytube. Pytube is really cool tbh. You can do a lot of automation for utub using pytube. There is a class in pytube name Playlist. All you need to do is to pass the playlist url
while creating the object and that’s it. You’ll get all the publicly available information of that playlist from that object. Below look in the example:
| |
In the above code you can see I can get all the video urls by passing the playlist url. That’s it, now all I had done is loop over playLists list (which was in PlayListUrl) and pass each url to the class, get the title and video_urls and save them to a json file.
In the next step I used this video links to download the video directly.
Downloading All The Videos from url
So let’s summarize what we’ve done so far:
- Manually copied all the playlist urls.
- Use those urls to get each video links and save them in a json file
Now the final step is to use each of the video url to download them. Again, Pytube to the rescue. As I’ve mentioned before Pytube can download any youtube video if the url is given. Now let’s see an example
of how pytube can download youtube video below.
Before that one big thing I need to mention is that for video download purpose I’ve used
pytubefixinstead ofpytube. You can think ofpytubefixis an extension ofpytube. Where it fixes lots of bugs and integrate new features but yet act exactly same aspytube.
| |
Let’s break it down the code piece by piece.
- First we created a
ytobject fromYouTubeclass. We have passed 3 parameters or arguments. First one is thevideo url, Second one ison_progressgenerator. The purpose of it to show a progress bar in the terminal so that we know how much download have completed at a given time. Finally we setuse_po_tokentotrue. I’ll discuss about this in details in a bit. - After creating
ytobject next we need to create anstreamobject. This is required to download the audio (or video). We use.get_audio_only()method to grab only the audio and exclude the video. - Finally we download the audio using the
.downloadmethod. There we pass 2 arguments. First,mp3=trueis telling to download the audio in mp3 format. Then,output_pathargument is telling the program to store the file in that path.
This is how we download a single youtube video using pytube or to be more precise pytubefix. Now in my usecase we have all the urls. All I did is created a loop and loop over each url and downloaded them one by one and stored them in a specific path.
Now Let’s Talk About Automation Issues I’ve Faced
Well well, it wasn’t easy sailing at all. Creating complete automation was way harder than doing a single video and that’s cause of youtube making it super difficult to download their videos. Here are 2 issues I’ve faced.
Manually giving po token: Remember
po_tokenwas set to true. So po token basically means proof of origin, basically this parameters is needed to pass alongside the url otherwise youtube will return403response. You can think of it some kinda authetication token where youtube is verifying if the request is from an active user or bot. Typically the browser create this po token automatically behind the scene. For my automation script I have to copy the po token from my browser and pasted in the terminal. I’m not going in details how to get thepo_tokenfrom the browser but I’m giving this pull request which explains how to get the po token from the browser and also how to automate the entire process.Getting blank audio file: After giving the
po_tokenand starting the automation script I’ve faced another issue which was there were lots of videos was taking a long amount of time to download and in the end those videos were failed to download and generated an empty file. I don’t know the exact reason for that but I’m assuming it is utub making it harder to download this video by using some bot protection. I didn’t investigate further. I was able to download more than 300 videos and the rest of the videos were failed to download.
Things to Consider
If you want to build this automation project then you can focus on these below things to improve this automation process and avoid the stupid mistakes I’ve made.
- Automate Playlist Urls: You should figure out how can you automatically get all the playlist url link for a given channel. So that you don’t have to manually copy and paste it.
- Automating PO Token Generation: If you follow the instructions from here then you can completely automate the entire automation script. Then you can run that inside a vm or schedule a run using github actions.
- Reattempt Failed Videos: In my case I was stupid enough to not take logs of the failed videos. Therefore I didn’t know which videos didn’t download in the process. But you can keep a log of all the failed video url and then create a retry mechanism where the script will try to download only the failed videos.
If you add the above 3 steps in the current automation script then you’ll have a much robust youtube download automation script which can be used for any usecase.
Creating the Transcription Pipeline
Congratulations! We’ve successfully downloaded youtube videos using the automation script. Now comes the fun part. We’ll transcribe all of this youtube videos in Bangla
Why Choose Evil Google
For transcribing the audio to bangla I had choosen google’s Gemini Flash 2.0. Now the question is why choose the Evil Google who is stealing all of our data. The reasons are:
- Google’s Generosity: This is the main reason, google is offering 1.5k free api request for gemini flash 2.0 without providing credit card. Google is the only one who is offering one of their frontier LLM with a free api quota.
- Gemini Flash 2 Performance: From my testing gemini flash 2 was performing really good in multilingual transcription. And google’s LLM perform better in Bangla than any other models.
So for above 2 reason I’ve choosen Gemini flash 2 LLM to transcribe the audio into Bangla. Though I’m giving google permission to use my api call to improve their models. But again I’m using youtube video data to begin with so that there is nothing confidential I’m sharing to begin with.
Generating The Transcription
Now I’ll show you how you can upload an audio file and get the transcription using the api. Remember the api key? We will use that api key to get all the response. I’ve explained my entire workflow for in the Transcription phase. I’m not going to explain the entire code but rather show you how to get bangla transcription for a single audio file. If you want the entire code then refer back to pipeline.py file in the Github repo.
If you haven’t installed
genaiclient already then install it usingpip install google-generativeai. But google is going deprecated this library and they are migrating togoogle-genai. Please refer to the docs for utilizing the latest library.
Setting up the API
Now let’s see the code snippet one by one. First we need to pass the gemini api key to the genai client.
| |
Setting Parameters
After setting up the api key now we’ll configure different LLM parameters (i.e: temperature, top_p)
| |
- First we set the
temperatureparameter value to 0 - then set the
top_pparameter value to 0.2 - then set the
top_kparameter value to 20 - Finally, we utilize structure output. Means the final response from the LLM will be in a
jsonformat. Where the key name will beBangla_transcription_from_audioand the value of that key will be thetranscription stringfor that particular audio,
What is Structure Output?
I’m going to talk very breifly about structure output. Structure output from LLM means forcing the LLM to give the output in a specific format. That specific format can be a json schema or xml schema. Currently the json schema is the most famous way to get the structure output from LLMs. The main reason to use structure output is to have control. Suppose when I was tring to transcribe the audio then there will be some additional text that will come with the transcribtion such as “Here is your transcription…”, “okay let’s transcribe it…”. This additional text won’t be added for structure output.
Creating System Instruction
We need to prompt the model so that model knows exactly what to do. This part can be refer as prompt engineering where we’re prompting or giving instruction to the LLM in a way so that it can give us the desired output. I’ve used the below instruction prompt:
| |
Creating the Model Instance
So far, we’ve setup parameters, created an instruction prompt and now we need to pass this alongside the model or llm name to create the model instance.
| |
Uploading Audio File
| |
In the above code we created a python function for uploading the audio file to the gemini. First we pass the audio file path in the path argument. And then it upload that audio file to gemini.
Getting the response
| |
In the above code we are doing:
- First creating a session or think of as a chat history, where we are passing the audio file that we’ve already uploaded to the gemini in the previous step. We’re just passing
files[0]means the first item from thefileslist. - Then we’re sending the message to transcribe the audio using
send_messageand saving the response to theresponsevariable - Since, the response is in
jsonformat therefore I’m converting the string (response.textcontains the response string) to a json object and saving it to agemini_json_response - Finally we’re printing the transcription which is in the
Bangla_transcription_from_audiokey of json object.
That’s it we’re able to generate bangla transcribtion from an audio using gemini llm. Now for my usecase all I did is loop over each audio file and generate transcription and save them to a json file. That’s it.
Future work
If you’ve read this far then I’d say dude you’ve genuine patience!! I’m not a professional writter or something, I write for fun and therefore my writing may sometime feel monotonous. Thank you! Ok, lets talk about what future improvement you can do if you want to make this project better.
RAG Application: You can create a complete RAG based chatbot using this transcription. Where the chatbot search for the answer from the transcription itself. I won’t go into details of RAG. This in of itself required another blog. I may write a blog on this in future but no promises.
Automation Pipeline: You’ve seen that the entire process can be automated. So my suggestion is to create an automation pipeline where an script is monitoring a particular youtube channel and if a new video comes in then it’ll automatically trigger the pipeline and transcribe the new video.
Package Update: I had built this project in february ‘25. I had started working before that. Therefore some packages are outdated. Suppose
genaipackage from google. I had usedgoogle-generativeaibut this package is deprecated and google is migrating togoogle-genai. So you can migrate this project to latestgoogle-genaipackage.
Gratitude
This project is a tribute to my sensei Rakibul Hasan. I’ve started my journey in AI by reading his books in 2019. Now I’m working as a professional AI engineer (though jr). I owe him a lot. If you’re starting your AI journey (specially deep learning journey) then here are some of his resources I’m listing below (all of them are free!)
- Python Deep Learning from Scracth (Bangla book)
- Natuaral Language Processing from Scratch (Bangla book)
My Next Blog
I’m going to write about one of my recent project that I’ve completed. It is about creating first bangla reasoning dataset. Stay tuned!