How We Created First Bangla Reasoning Dataset
Bangla reasoning dataset synthetically generated from deepseek-r1

Time to deep dive to find out how to build a synthetic Bangla reasoning dataset using DeepSeek-r1
Origin of the Idea
It was in january of this year and suddenly the world was taking over by the DeepSeek-r1. It was the first open source reasoning model and
boy oh boy it was good. I was playing with it and instantly fall in love with this model (not that type of love). I was able to solve lots of
complex problems using it. In that time only o1 from openai can come close to its performance. But for me the most interesting thing was the
reasoning traces. I was able to see all the reasoning that the model was doing before the final answer.
That’s when I tried to think what if the model can reason in Bangla? I tried to prompt the model specifically to think in bangla.
But no luck! The model either think in English or Chinese. Then after doing bit of research I got to know that the model was trained in such
a way that it will think in the dominant language that it was trained on. That’s why I failed to prompt it. I’m not going into the details of why that
is the case, if you want to know more then you can search GRPO and how it works.
And here you go that’s when I think how ‘bout I create a dataset that can be used for supervised finetuning to mimic the reasoning capabilities
but the reasoning is happening in the Bangla. And from this idea we started working on creating the first ever Bangla reasoning dataset.
Dataset & Codebase
For the impatince one who doesn’t want to read the blog and just want the dataset or see the code (though I’m warning the codebase is a hell due to my skills issue) I’m providing them in the begining of the blog.
- Bangla Reasoning Dataset - DeepSeek-r1-Distill-Bangla-MMLU-Reasoning-Data
- Github Repo - DeepSeek-r1-Bangla-Reasoning-Data
Where to get the money?

Okay, the above picture isn’t true but still I needed to figure out a way how to manage the cost. You see I wanted to use the reasoning traces from DeepSeek-r1. Even though their usage from the website is free but I needed to use the api which is not free. So my initial budget was 5k BDT. To the rich people that’s no money but man, I’m broke. I started working for couple of months (back then) so don’t make much to begin with. So I need a partner where we can split the bill. That’s where my man Numaer comes into the picture. He was the unsung hero of this project. Not only he split the bill but also setup all the logistics such as billing and etc. And after that he also helped me with the project. He is also a NLP/python guy so our interest and expertise are almost same. In the end we were able to finish the project and the final cost was around 7K BDT. This couldn’t possible without the help of Numaer. Thanks my man, I owe you.
How did we do it?
Enough talk now let’s dive in the nitty gritty of how we created the synthetic bangla reasoning dataset. Before that I want to stress that this is going to be step by step process of creating this dataset but this blog is not a code walkthrough. I’ll be discussing our thought process and and what steps we followed. If anyone interested in the code then I’d suggest you to look into the codebase.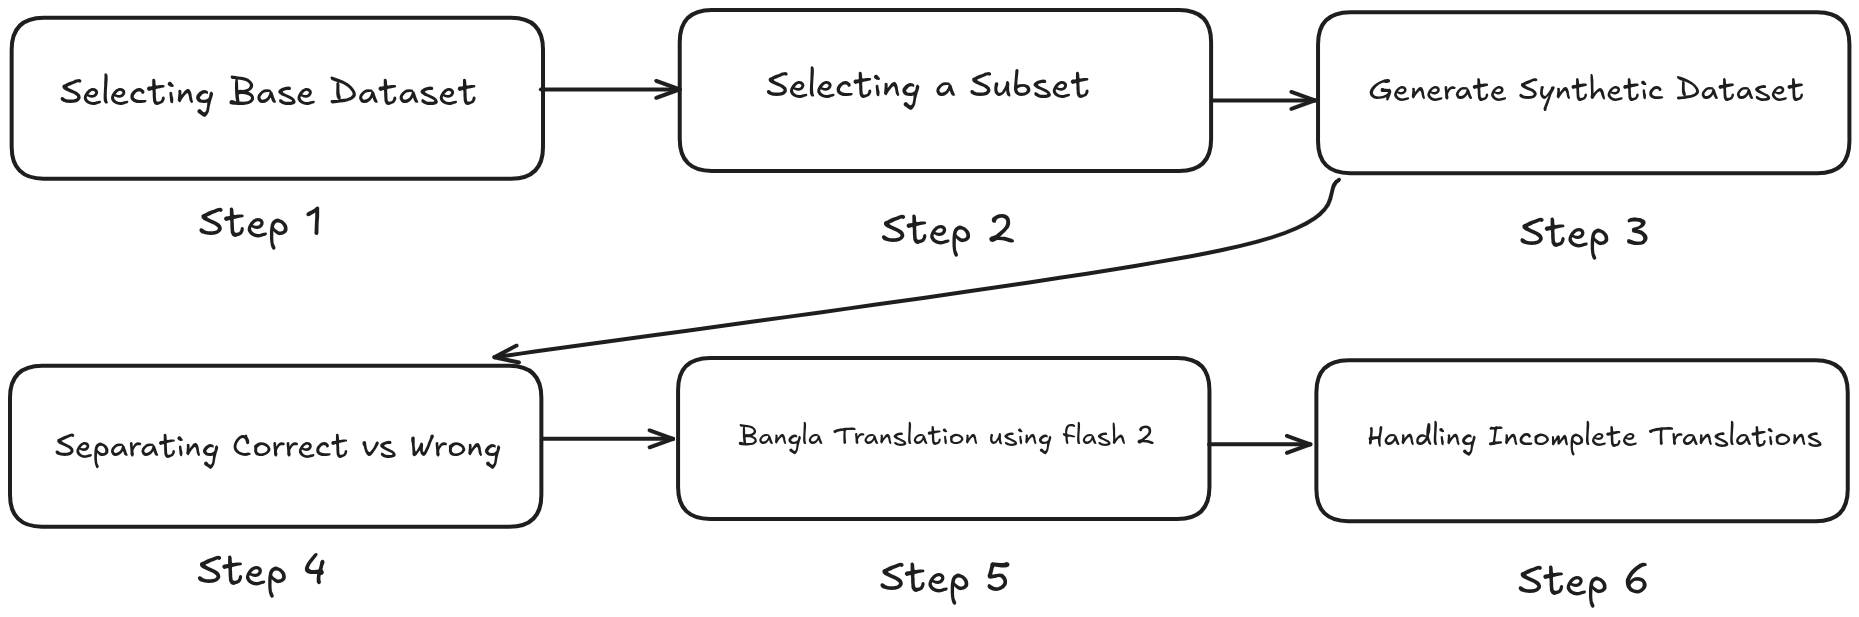
Selecting Base Dataset
As you can see in the above diagram which lays out the entire step by step process of generating the synthetic reasoning dataset. The first objective was to select a base dataset. We need to find a dataset which is suitable for this task. But now the question arises which type of dataset is best for our task? We have to find a dataset which have below criteria:
- Have Question-Answer pair
- The Answer requires reasoning
So I start hunting for dataset and that’s where Hisab (or currently known as VerbexAI) comes into the picture. For those who don’t know who is Hisab, they are basically a top tier AI company in BD and they do alot of research related to LLM, STT etc etc.
They are super nice cause they are open sourcing most of their research. So, you can guess I’ve found the perfect dataset from one of their open source work. They had released a bangla dataset name Bangla MMLU.
It is a multiple choice question dataset. Where there is a question, 4 possible option to chose from and finally the correct ans of the question. All the question were collected from different type of examination (i.e: Admission test, Job Exam etc etc.) in Bangladesh.
So it is needless to say this dataset was the perfect fit for our task. It not only have Question-Answer pair but also comes with Options. And since the questions are from examination, so most of
them require reasoning before answering them. So we chose Bangla MMLU as our base dataset.
Selecting Subset
In this phase I had made a rookie mistake. You see the original Bangla MMLU dataset contains around 87k samples and the budget we had was around 7k BDT for synthetic data generation. So what I did was
create deepseek-r1 response for some of the questions and try to calculate the average token usage. From the calculation the average token usage was showing that we can complete the entire dataset with our budget.
But boy oh boy we were so wrong. After we started generating the dataset we soon realized that our sampling was too small for average token count and we needed way more tokens to finish the entire dataset. But it was
already too late. We had started generating the synthetic data from the start of the dataset. So we didn’t change anything and continued to generate the synthetic data until we exhausted all of our budget. I’m
admitting we could’ve done much better in this phase, we should have atleast done random sampling but due to our wrong calculation we started from the begining and continued until all of our credits were finished.
We were able to cover around 20% of the whole dataset with 7K BDT budget. From there total train samples were 17,796 and validation samples were 2,576. Totalling 20,372 samples were generated synthetically.
Generating Synthetic Reasoning
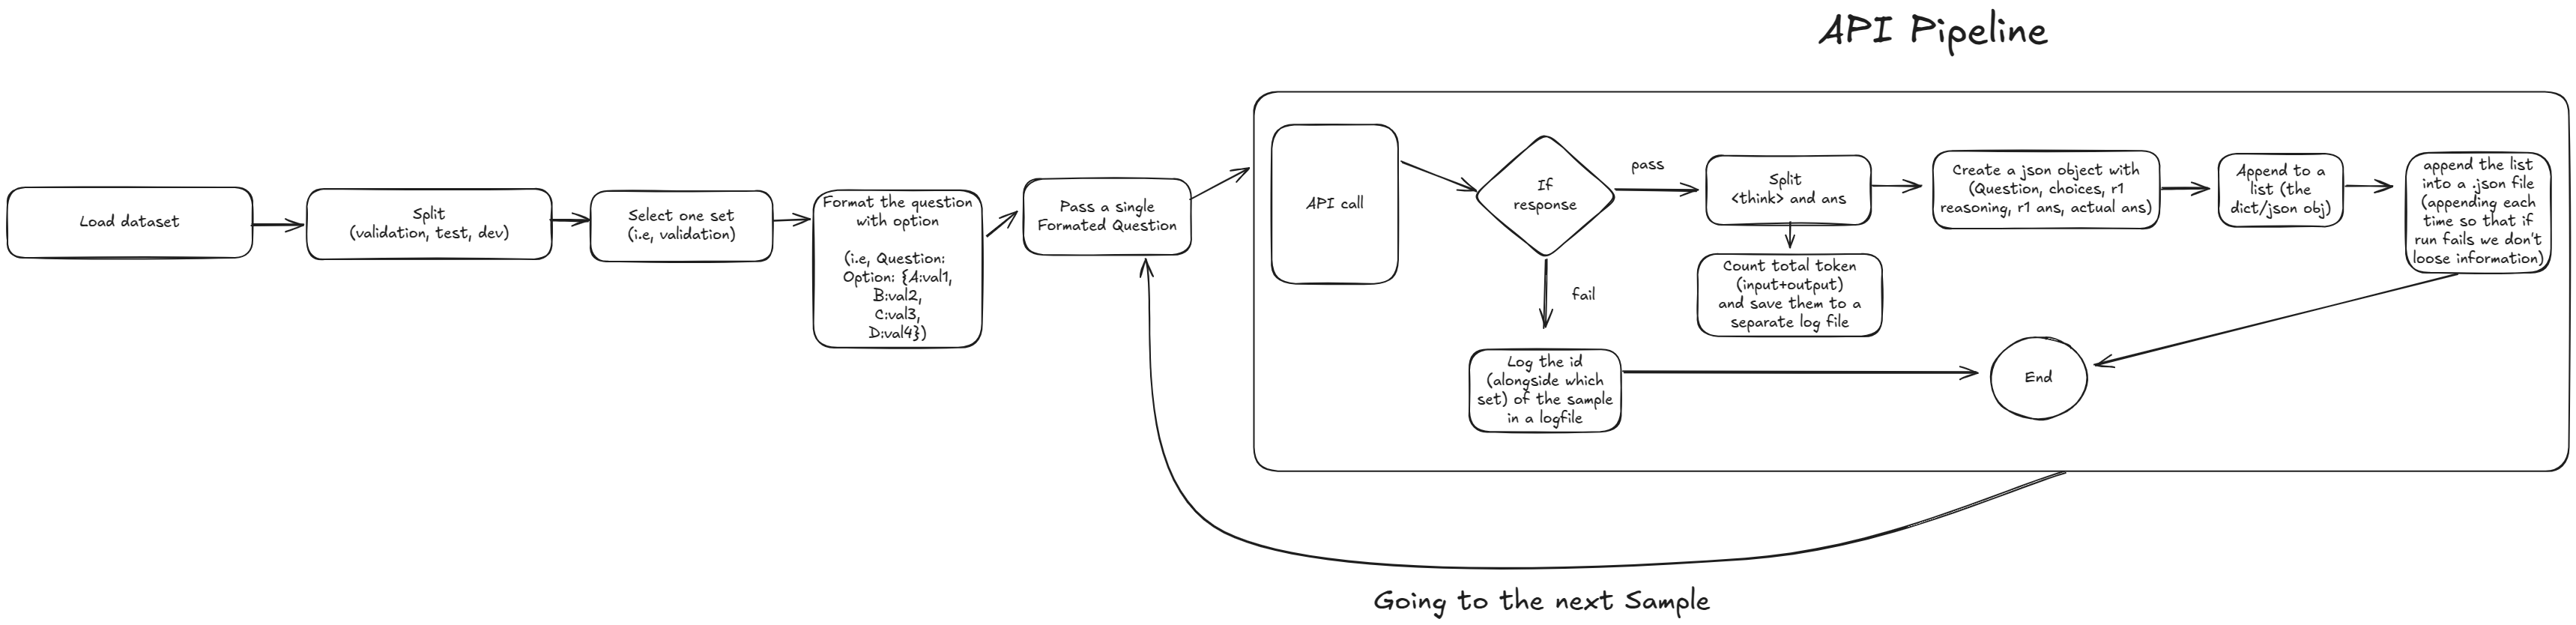
Let’s start discussing the step by step process of creating the synthetic reasoning from the DeepSeek R1. Don’t get intimidated by the above diagram, as I’ll be discussing each of steps.
1. Load Dataset: The first task was to load the Bangla MMLU dataset from the huggingface. Since it was hosted on huggingface, downloading the dataset was pretty straightforward task by using the datasets library from the huggingface.
2. Getting the Split: The Bangla MMLU dataset is divided into 3 splits (validation, test, dev). For our usecase we only used 2 of the splits (validation and test).
3. Selecting One Set: We select a single set and started generating synthetic data for that particular set. After finishing that set we move to the next set. We started with test set and after finising that we move to the validation set.
4. Format the Question with Options: In this phase we formatted the prompt. We first formatted the question and it’s options and then add the system prompt. The process was straightforward. First, we take a sample and get its question and corresponding options. Add
all of them in a string. Below is an example of how a single formatted sample will look like.
| |
I kept the system prompt as minimal as possible cause I wanted the raw reasoning of the model without guiding too much. Below is the system prompt:
| |
5. Passing A Single Formatted Sample: Since deepseek-r1 doesn’t support structured output therefore we only pass a single sample at a time. And also passing a single sample at a time makes more sense otherwise the thinking process might get confused in the model.
6. API Calling Pipeline: While calling the api, we went through multiple steps. Therefore, this step can be a pipeline in and of itself. Let’s break down each component:
- If response fails: We were using Hyperbolic for the DeepSeek api. Unfortunately we couldn’t get the original deepseek api cause they don’t allow to buy credit using Bangladeshi credit card. Hyperbolic was offering the similar pricing but their uptime was not good. There were many times it was failing to respond. Therefore I had a check for failed response. When we didn’t get any response or failed response we simply log the id of the failed sample and move to the next sample.
- Split Think and Ans: After getting the success response from the api the next step was to seperate the thinking and the final ans from the response. This was easy since the deepseek encapsulate its thinking process inside the
<think></think>tag. So all we had to do is use string split based on this tag where everything inside the tag is considered as reasoning and put them inside a separate variable (think) and put the rest toansvariable. In this step we were also counting the total input and output token and logging them into a csv file. - Create a JSON obj: In this step we created a json/dictionary object where it contains
key: valuepair.Original Question,Original ans,id,Options,generated reasoningandgenerated ansall of these values were stored in the JSON obj. - Append to a List: At the begining we initialized an empty list and after every successful api response we were appending the json object to that list.
- Writing to .json file: This was crucial since the list was in ram and if somehow the system crashed then all the progress we would be lost. Therefore I was writing the list to a json file after each successful api call so that even if the system crashed we had everything on disk.
And this is how we continued the process for each sample and move to the next sample. First we finished the test set with 2,576 samples and move to validation set and completed 17,796 samples.
Correct Vs Wrong

We’ve successfully generated the synthetic data with reasoning traces. Now all we’ve to do is translate the data into bangla and that’d be enough, right? All the generated responses were right, right? Uh….nope.
You see I thought most of the answers generated from the model would be correct and if there were some wrong answers then that’d be couple of examples not much, right? I was dead wrong. After
manually checking just couple of examples (around 50) I started to see around 15%-20% of the answers were incorrect. Now these answers were complete noise. We have to remove them before
translating the dataset. But now the big question is how in the world I remove them? The dataset size is around 20K+ samples. It took almost 10 minutes for me to check 50 samples. Now imagine
how long it’d take for me do this for 20k+ samples. No, don’t imagine it, cause I ain’t doing this.
I came up with a plan to automate this whole process. The plan was actually simple. We have generated ans and original ans (correct ans). Why don’t I give these 2 information to an LLM and tell it to classify True or False? If both matches then it’s True. otherwise it’s False. After that remove all the False sample from the dataset and we have a dataset which contains only the right answered samples. Let’s see the process in details.
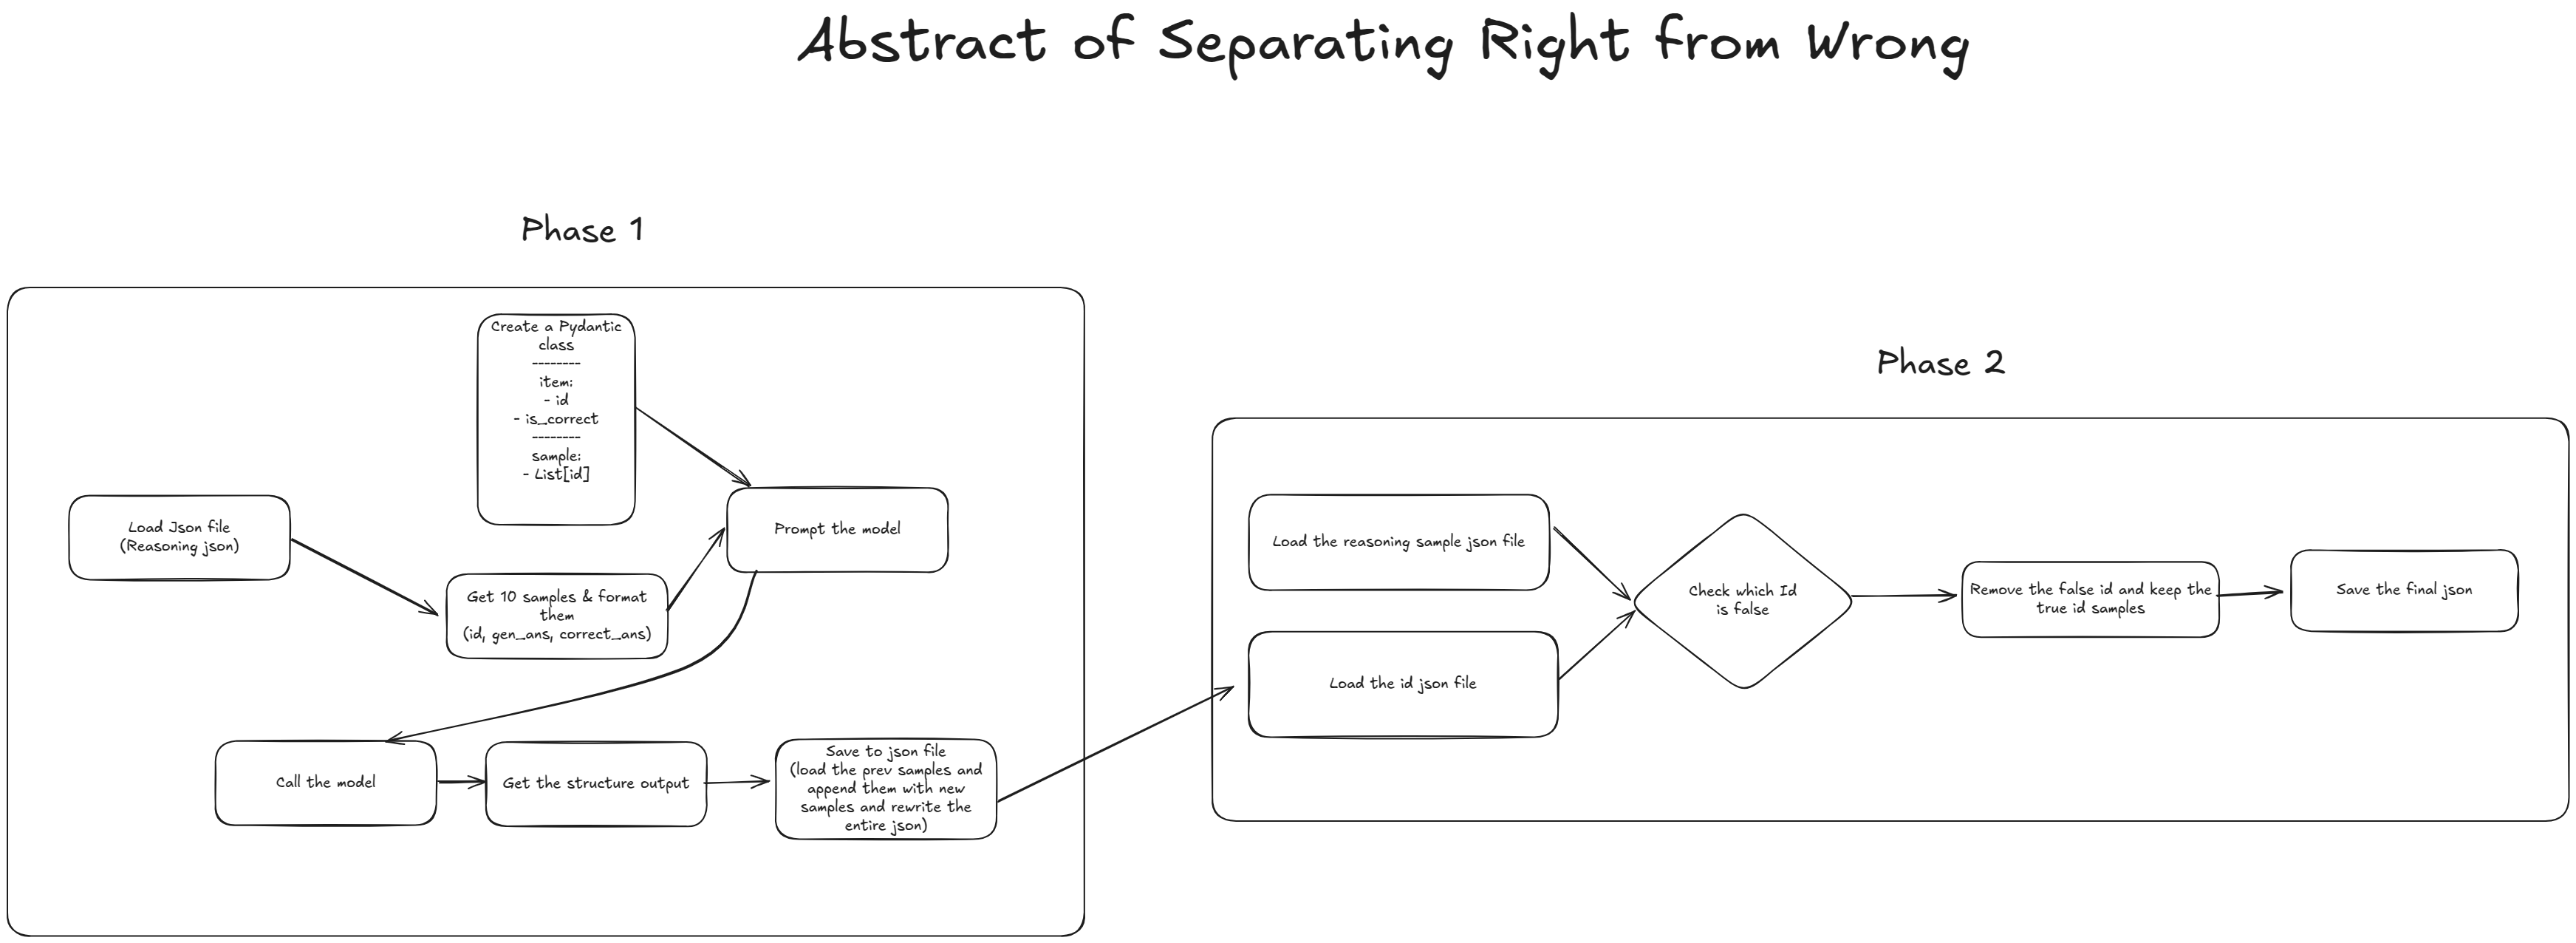
I promise the above diagram looks complex but in reality the process is actually simple. We’ve divided the entire process into 2 phases.
- LLM Classification (phase 1): Get the sample id and classification (true or false) from the LLM
- Removing Wrong Samples (phase 2): Remove all the false samples using the sample id and keep only the correct samples.
LLM Classification
Let’s see how we classify between right and wrong samples.
1. Load Reasoning Json: First we loaded the entire synthetic dataset which was saved in a json file.
2. Format 10 Samples: Before passing to the model, we needed to format the samples. We had to take a crucial decision and that was instead of passing single sample for classification
we would be passing 10 samples as a list to the model. Why 10? The main reason was that we were using Gemini Flash 2 (and it was the free tier). They allow 1,500 api requests per day. So if we were using a single sample per api call then we had to wait for days to complete this. That’s why we passed 10 samples at once and separated them based on id using structured output (will be discussing below). So, for each sample we created a dictionary where that contained sample id, generated ans and original ans. And finally all of the dictionary items were bundled inside a list and that list is directly passed to an LLM.
3. Pydantic Class for Structured Output: Above we talked about structured output. Since we are passing 10 samples at once we need to have some sorta structured output so that we can identify
which sample is which and what’s thier value. For structured output we can create a pydantic class where we define a class and that class will be used as output schema and guide the model to give the output in structured format. Below is the pydantic class we define for structured output:
| |
Here, first we create an item class where it has 2 properties (id and correct). Each of the items or samples will have these properties. And finally in the Sample class it has all_samples property. We’re defining all_samples as a property that will be a list of item objects. Means the final output will be in a list where each of the elements will be an item object. Each item object has the properties of id and correct. And that’s how we can track which sample is which and what their classification is. Below is an example of how the final output should look like:
| |
4. Prompt The Model: We’ve formated the samples and also created an output schema. Now all we have to do is pass the formatted samples and the output schema to the prompt. I was using genai library from Google. While we can directly pass the formatted sample list using the f string in python but for output schema we need to pass the schema class to config argument. For details please check out the documentation for structured output using gemini. Below is the entire system prompt that was used for LLM classification:
| |
5. Calling & Saving the Structured Output: Now just call the model via api and get the structured response. After getting the structured response, we convert that to a json file (gemini response is always in string format). In each api call we wrote the json object to json file so that if the system crashes we won’t lose the existing progress.
Removing Wrong Samples
This is the 2nd phase and it was really straightforward. All we needed to do is compare the id and separate the wrong (or false) id from the synthetic dataset.
- We first loaded both of the .json files. One is the synthetic data another one is the LLM classification data (created in phase 1).
- Found all the ids which had
falsein the LLM classification json file. - Then removed those ids from the synthetic dataset.
- Finally saved a new version of the synthetic dataset containing only the correct answers.
After that we got total 20,372 samples (all of them were correct). From our estimation the entire synthetic dataset (including val and test) had around 14% or 2850 wrong answers. We removed all of them and got the final dataset which will be used for translation.
Bangla Translation
Let’s take a moment and recap what we did so far. First, we had generated synthetic data with reasoning traces. Second, We filtered out all the incorrectly answered samples and kept only the correctly answered samples. Now we had only one final step to complete this process. That was translating the synthetic data into Bangla. we would translate both the reasoning and the final answer for each sample.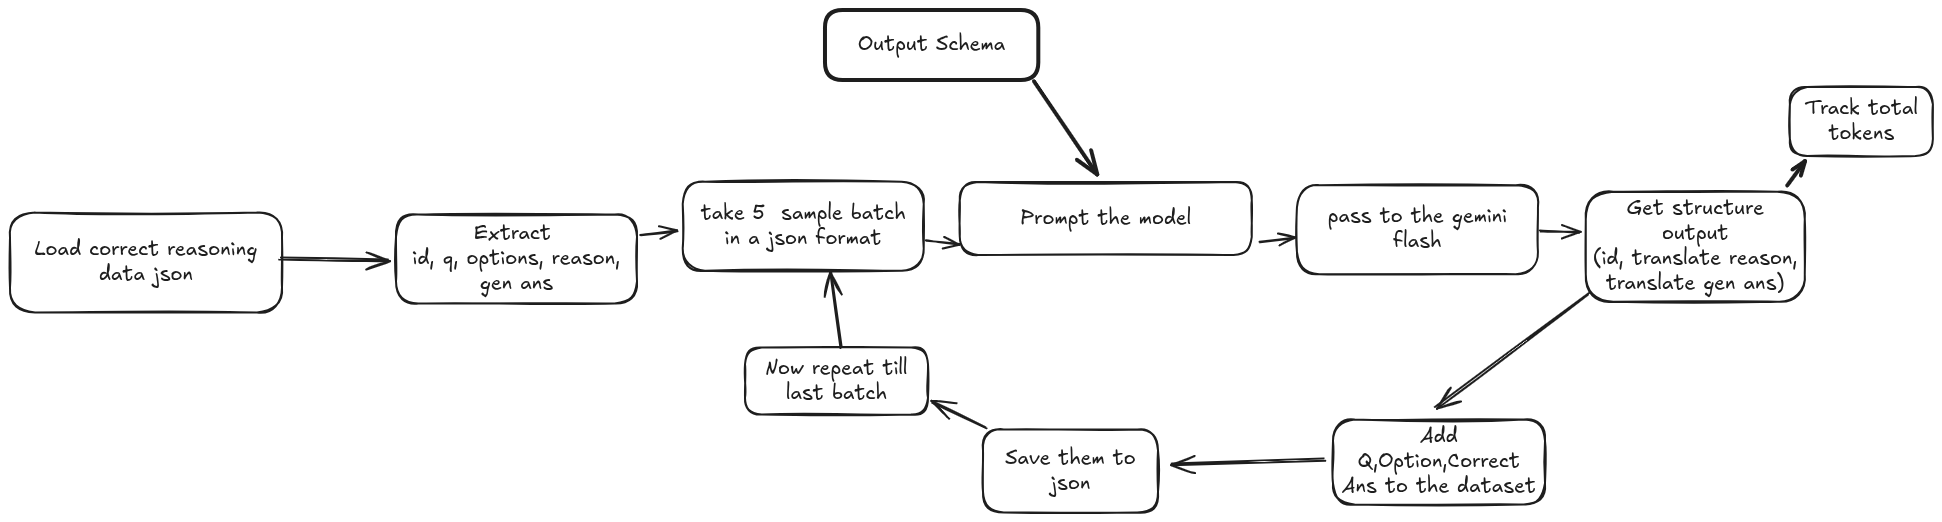
From the above overview you can already guessed the translation process is almost identical to the LLM Classification phase. Here, we are translating each sample instead of classifying,
1. Load & Extract: We loaded the filtered synthetic dataset that we had created in the last step. After loading the json file we extracted only the id, question, options, reasoning and generated ans from the dataset. All of these values will be passed in the prompt for translation.
2. Format 5 Samples: Each batch or api call will have total 5 samples (similar to llm classification). The reason for 5 samples is the same as above (free api rate limit). But the question is why 5 then? Why not 10? Gemini flash 2 can output close to 8k tokens. And when I tried with 10 samples it was not able to complete the response due to token limitation. Therefore I had to reduce the number to 5 samples per api call. Even then there were some batches where gemini couldn’t finish the response. I’ll talk about this later. The format of these samples were list of dictionaries. Where the list contained 5 dictionary. And each dictionary had all the extracted value (extracted in the step 1).
3. Output Schema: Since we were utilizing multiple samples in the same api call and also we had both reasoning and ans in each sample so we needed an output schema for structured output. The output schema was:
| |
The schame was similar to the one we used in the LLM classification, but here, instead of
correct property, we had 2 new propertise: reasoning_translation and ans_translation. As you can guess, these two properties will store the translation for reasoning and ans respectively.4. Translation Prompt: This prompt is very important, cause the translation of the dataset decides the quality of the final dataset. I played with couple of iteration and finally come up with this one which had given me the best outcome. My objective was to maintain the semantic meaning after translation, do not translate scientific terminologies etc etc. Below is the entire translation prompt that is being used for translating all the samples:
| |
5. Call & Get Output from the Model: Now we passed the prompt alongside with the formatted samples and schema and called the model. After each api call we got structured output as response. That structured output was then converted to a json object from a string. Also for each api call I was logging the total token usage in a csv file.
6. Adding Other Properties: The structured output contained only the id, reasoning translation and answer translation. However, we still needed to add other properties from the dataset before saving them. For each sample we mapped the id and then added the Question, Options and Correct Answer to each dictionary item. So final dataset will contain all of these values.
7. Save & Move to Next Batch: After each successful api call and and once the above properties were added, we saved them to a json file and moved to the next batch.
And, this is how we translated the entire dataset.
Handling Incomplete Translation
Gemini flash 2 can output upto 8K tokens per api call. So in many cases we weren’t able to get the complete response. For those sample we did the following:
- First we identify which samples were missing. We compare the translation dataset and filtered synthetic dataset and find all the ids that were missing in the translation dataset.
- For the missing id we followed the translation process but instead of passing them with 5 samples we passed a single sample for each api call. Since the number of missing samples wasn’t significant, therefore passing single sample didn’t hurt us with the api rate limit.
- Finally, we saved each one of the translated samples to the json file the same way we saved the other translated samples.
And there you go! That’s how we created the first-ever Bangla Reasoning dataset (I hope so) and open-sourced it.
Limitations
I am proud of the work we had done but that doesn’t mean our work is perfect. Actually far from it. While working on this we had made lots of rookie mistakes and I am going to acknowledge all of them here.
- Not Filtering Reasoning Samples: One of the limitations of this dataset is that we didn’t filter out lots of memory based question. For reasoning dataset it doesn’t make much sense to have memory based question which can be answered from memory without doing any reasoning steps. The Bangla MMLU dataset have lots of memory based question, specially history, bangla and english domain questions were memory based.
- Not Validating Reasoning Steps: We did filter out all the incorrect samples. But we didn’t manually check the reasoning traces from the model. Our assumption was that if the answer is correct then the reasoning has to be correct. But this doesn’t have to be true. There is a possibility where the reasoning can be wrong but the model arrive to the right answer. We didn’t validate the reasoning steps.
- Translation Will Lose Meaning: I tried my best to prompt the model in such a way where we lose as little as possible from the original. But there will always be a limitation of translation. Translation will never be able to match the original text.
Some Words We Like to Share
Me and Numaer had worked really hard on this project. We are just starting our careers in this AI field. But we wanted to contribute to the community specially to Bangla AI community. That’s why we even spent money to make this project. All the money were spent from our own pocket and we didn’t have any funding. But that’s okay, cause we were having fun and that’s what matter to us most. But we wanted to share some thoughts:
- As I’ve discussed above, we wanted to contribute to the Bangla AI community. We wanted to push the open source AI in Bangla, so that we can have good quality LLM/VLLM. For that we need good quality data first. And this is our attempt to create quality dataset.
- We spent money on this, and we could gatekeep this dataset and publish our work to some journal. We still might publish our work but we choose to not gatekeep this dataset and publish it so that open source community have access to the dataset from day 1.
- We want you guys to extend our work. Fix the limitations we had, create more samples, finetune more models, create reasoning models. This way we’ll drive the open source Bangla AI development.
- We don’t want recognition. Go use our dataset, and build cool stuffs.
Connect With Us
Thank you for reading this far. I tried to keep it as short as possible but couldn’t. I still have a long way to go as a writer. Sorry for the monotonous writing. But, hey atleast it isn’t some AI slop. I didn’t use AI for writing cause I want my own identity in my writing and I want to enjoy the process. I’m still learning to write quality content. I’d appreciate any feedback. You can share or contact us Linkedin:
I’ll be writing more blogs. Till then adios.